Pain Free Pilates Exercise
Want to learn a pain free Pilates exercise?
Pilates is a great way to exercise the whole body through a series of stretching and strengthening movements.
Most healthy individuals can safely and effectively perform the classic mat exercises, through good instruction.
But...when you have a back and/or joint condition learning how to do pain free Pilates exercises is another thing.
Many people with low back pains, hip pain, including sciatic pain, stenosis, osteoporosis, and other degenerative back conditions shy away from doing Pilates exercise because they believe it will hurt them more.
The truth is Pilates, when done with proper instruction and using the fundamentals, helps to realign and balance the skeleton.
In particular, the spine.
Pilates exercises are designed to strengthen the muscles that support and protect your back!
Look below for the right way to position your spine without risk of back pains and injury.
NEUTRAL SPINE-PILATES EXERCISE:
DON’T
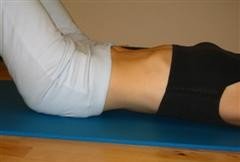
try to imprint the spine or flatten it into the mat when exercising, it can cause compression on the discs of your spine.
DO
keep the spine in a neutral position or with the natural lumbar(lower back) curvature.
This means you should have a little space between the low back and the mat keeping your upper to middle ribs pulled down.
Working in neutral spine is the safest and most effective position to strengthen the back and core and for your muscles to work correctly.
I work with special populations, many with spinal conditions that need modifications on the classic mat exercises to assist them in working through a pain free Pilates exercise session.
These clients have pain and when they first begin they are very hesitant to do certain exercises because of this fear.
Many of you may be in the same boat, but I encourage you to try, progressing a little at a time.
Go to the point of pain, but not into it if you have had a recent injury that you are rehabbing.
Once these clients get through the first session without pain during or after a session they keep coming back and gain more strength and confidence in their bodies.
Let’s take a look at some more ways you can work through some of the classics to make up a pain free Pilates exercise program for your aches and pains.
THE CAT STRETCH PILATES EXERCISE:
DON’T
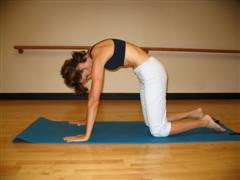
Shrug your shoulders up into your ears or you will create more upper neck and shoulder tension that you really don't want.
DO
Press into your hands evenly and flex or curl from your pelvis, tucking your tail under as you roll up through the top of the head curling yourself feeling the shoulder blades down your back.
Send a little more weight into your heels to take some pressure off your wrists and shoulders.
See the full Pilates Cat Stretch here.
PILATES SIDE KICKS:
DON’T
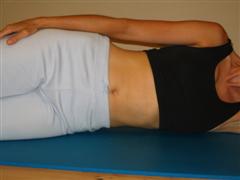
Do the side kicks without the waist long and your hips and shoulders stacked evenly over each other for better alignment. Also, use extra padding as you lie if you have hip bursitis or bony hips like me.
DO
The side kicks pointing the foot as you reach up and flexing as you slowly pull it down lengthening at the waist. Be careful not to reach so high that your waist sinks down into the mat.
When doing forward and back movements bend your bottom leg for more support and to keep from rocking your hips and shoulders forward and back.
See more of the Pilates Side Kick exercises here.
LEG CIRCLES AS A PAIN FREE PILATES EXERCISE:
DON’T let you tailbone come off the mat when you extend your leg up.
This puts pressure in the lower back and doesn’t allow you to stabilize the hips and pelvis when circling.
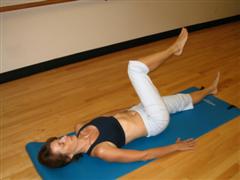
DO keep your pelvis still and parallel with the ceiling. Also, do a modification such as bending the leg you are working, especially if you have tight hamstrings.
This will help you feel the work in the thigh bone as it slides down into the hip socket.
This modification will also help you to circle the leg without hip pain and to keep the torso from rocking side to side.
Find more ways to do this exercise by going here.
Recent Articles
-
Pilates after Total Knee Replacement
Apr 23, 20 06:20 PM
It's 2 yrs.post op since I had total knee replacement in both knees. In order for them to last it's recommended that you lift not more than 25 lbs. Pilates -
SI Joint Pain Improved with Pilates!
Aug 11, 17 12:29 AM
Dear Jennifer, I just wanted to reach out and thank you for dramatically improving and changing my life. About a year ago, I woke up in debilitating -
Hip pain after 4 months of Reformer Pilates
Jul 12, 17 06:44 PM
Hi, I had a total right hip replacement 8 months ago; I rehabbed really quickly, although I was also (and still am) dealing with L4 spondylolisthesis.
 | Get Instant Access to Loads of Color Pictures, Postures, and Information Designed to Increase Comfort and Happiness. Learn to Enjoy Life Again! Learn More! |

New! Comments
Have your say about what you just read! Leave me a comment in the box below.